 |
  |
 |
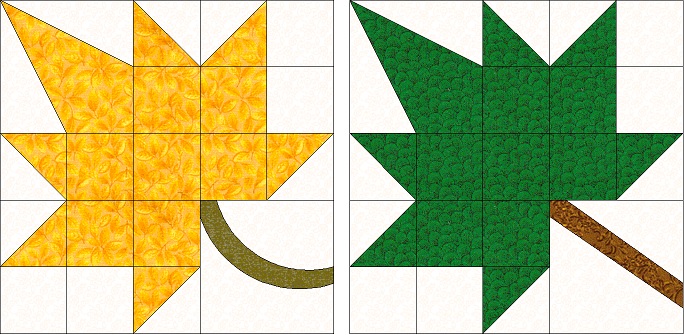
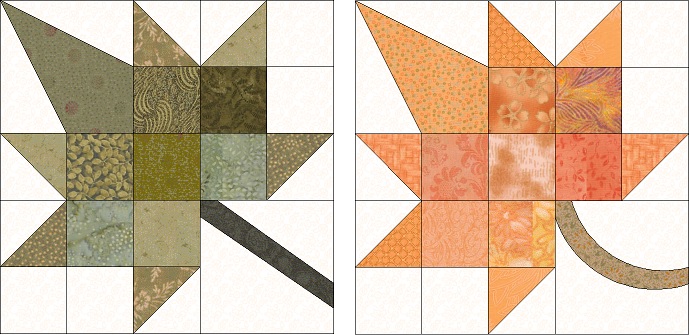
To make a 10 inch scrappy Sweetgum Leaf you need:
One 4 1/2 inch square for the pointy top of the leaf
Three different 2 7/8 inch squares for the other points of the leaf
Seven different 2 1/2 inch square for the leaf center
For the background three 2 7/8 inch squares, four 2 1/2 inch squares, one 4 1/2 inch square and cut two 4 1/2 by 4 inch rectangles.
For the stem, see below.
For a non-scrappy leaf you need the same pieces all from a leaf fabric.
One 4 1/2 inch square for the pointy top of the leaf
Three 2 7/8 inch squares for the other points of the leaf
Seven 2 1/2 inch square for the leaf center
And from the background fabric three 2 7/8 inch squares, four 2 1/2 inch squares, one 4 1/2 inch square and cut two 4 1/2 by 4 inch rectangles.
For the stem, see below.
For the stem - As you can see you have a choice of stems, either straight or curved. For the straight stem you would need a scrap of a darker fabric that is about one inch wide and six inches long. For the curved stem you would need a piece about the same size except that you want that piece to be on the bias (stretchy). The curved stem would be appliqued to the 4 1/2 inch square of background. Or you could fuse it with your favorite fusible.
| For the straight stem, cut the 4 1/2 inch square diagonally through the middle (or slightly off center if you want) and sew the dark stem in the center as shown. Then square that piece back to 4 1/2 inches. |  |
 |
If you'd like a slightly crooked stem, just cut that diagonal line slightly off center. Just remember that these edges will be bias, and you need to handle them carefully. Just follow the same directions as above, squaring your stem unit back to 4 1/2 inches to finish. |
Now let's make the leaf point.
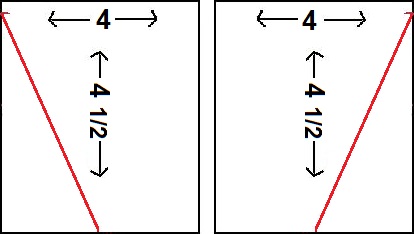
| On one of your 4 1/2 by 4 inch rectangles draw a diagonal line 1/8 inch from the top left corner to 1/8 inch to the right of the center on the WRONG side of the fabric. To easily mark the center, gently fold
the rectangle in half and pinch the bottom to make a slight crease. Or you can mark your bottom mark 2 1/8 inches from the right edge. Repeat the same thing with your remaining 4 by 4 1/2 inch rectangle. Draw a diagonal line 1/8 inch from the top right corner to 1/8 inch to the left of the center on the WRONG side of the fabric. Or you can mark your bottom mark 2 1/8 inches from the left edge. |
 |
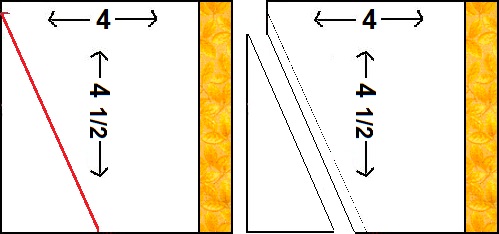 |
Now take one of your rectangles and place it carefully on a 4 1/2 inch leaf point fabric square. Place the rectangle on the square as
shown here and sew on your marked line. Trim leaving a 1/4 inch seam allowance. Diagram shows wrong side |
| Press but don't bother trimming the excess yet. | 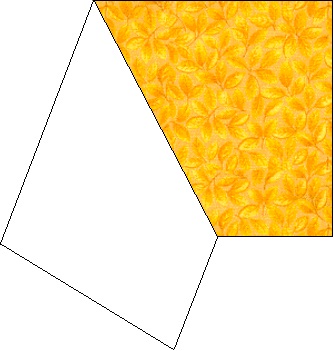 |
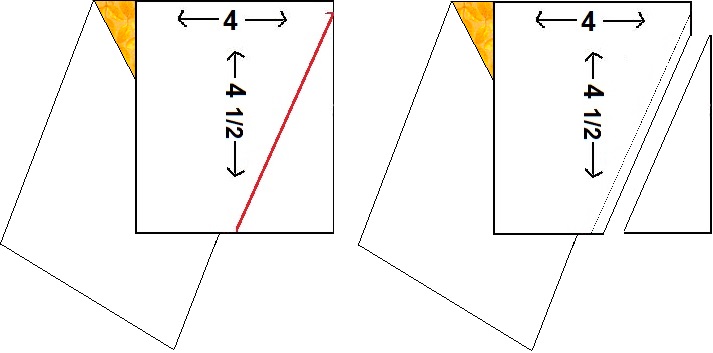 |
Repeat with the right hand side, following same steps as above. |
Press, and now you can trim off all that excess. Using your 4 1/2 inch square as your guide, trim the excess from the star point fabric.
Diagram shows wrong side
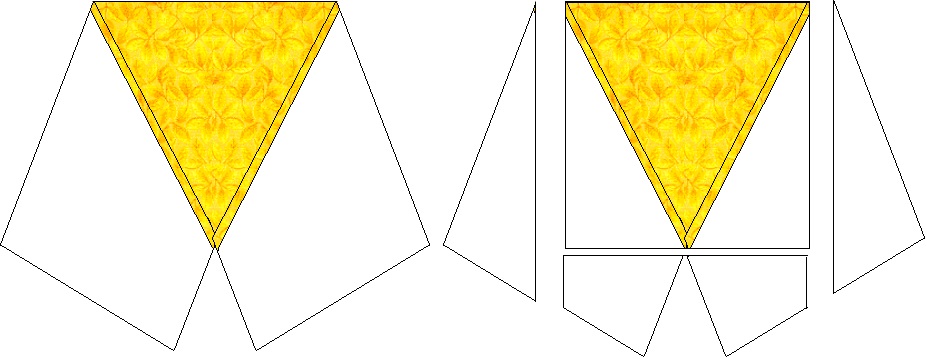
Next you need to make a few triangle squares.
We're going to make a few triangle squares for our leaves. Place a 2 7/8 autumn color block and a 2 7/8 background block right sides together. Carefully draw a line down the center, corner to corner, diagonally across the block. (This will be a cutting line when you are finished.)
If you have a true 1/4 inch foot on your machine, you can sew on 1/4 inch either side of this drawn line. If not, you will have to draw a second line on either side, exactly 1/4 inch from the first line. This will be your sewing line.
After you have sewn on your sewing line, 1/4 inch on either side of your corner to corner to line, cut this square in half on your cutting line. You will now have two triangle squares, which should measure exactly 2 1/2 inches. Repeat with all of the 2 7/8 inch squares, you need six triangle squares.

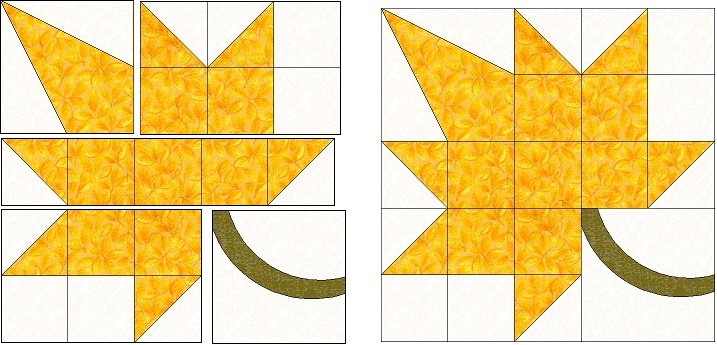
And now you can put the block together a segment at a time as shown here.
Here are measurements to make different size Sweetgum Leaves. (A 16th is an odd measurement and some rulers don't even have 16ths on them. A 16th is what some people call a scant measurement, or between an eighth and a quarter on your ruler)
For a 4 1/2 inch finished leaf cut the large squares 2 5/16 inches, the small squares 1 3/8 inches and cut 1 3/4 inches for the triangle squares.
For a 6 inch leaf cut the large squares 2 7/8 inches, the small squares 1 11/16 inches and cut 2 1/16 inches for the triangle squares.
For a 9 inch leaf cut the large squares 4 1/8 inches, the small squares 2 5/16 inches and cut 2 5/8 inches for the triangle squares.
For a 12 inch leaf cut the large squares 5 5/16 inches, the small squares 2 7/8 inches and cut 3 1/4 inches for the triangle squares.
For a 15 inch leaf cut the large squares 6 1/2 inches, the small squares 3 1/2 inches and cut 3 7/8 inches for the triangle squares.
These are finished sizes, after the block is sewn into a quilt.
Posted August 25, 2014
Copyright © Delaware Quilts 2014
The content on these pages, including text and images are the sole property of the Delaware Quilts and may not be used or reproduced in any manner without consent. All Rights Reserved.